As the latest OSes support creating bootable installers out of USB sticks, it now has come a usual case to convert these bootable USB drives into Virtual Hard disks so that you could attach them as bootable disks for installing OSes on virtual environment.
In this example, I’ll providing the steps for setting up this for scenario of converting MAC OS X Mountain Lion USB installer into a VMDK file and attaching it in Virtual Box
- Create your Mountain Lion USB Installer stick by using the steps details in Creating MAC OS X Bootable USB Setup
- Launch VirtualBox as Administrator on your Windows system (if you do NOT open it as Administrator the next command will fail as shown)
- Use below command and figure out the USB disk ID. Usually \.PHYSICALDRIVE0 would be your local C: Drive and then comes your USB drive \.PHYSICALDRIVE1 (if there are no other drives)
- Run the command:
C:>wmic diskdrive list > C:tempdrvieslist.txt
C:>notepad C:tempdrvieslist.txt
C:>
VBoxManage internalcommands createrawvmdk -filename "FILENAME" -rawdisk \.PhysicalDrive#
- Now you can go to VirtualBox Manager, select the VM to which you’d like to attach the newly created VMDK file
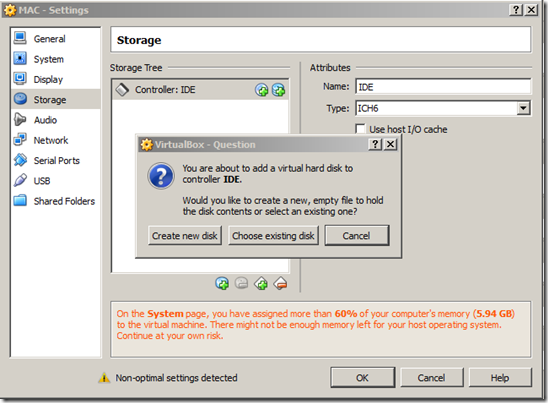
- Select VM > Settings > Storage > Click
- Add IDE Controller >Change type to ICH6
- Click Add new disk

- Choose existing disk
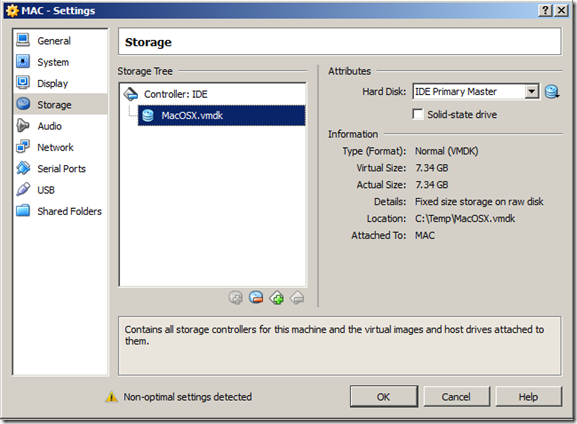
- Attach the newly created C:tempMacOSX.vmdk file and click OK

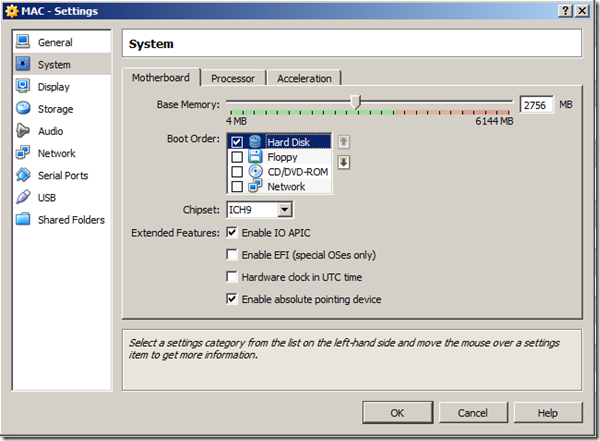
- Change the boot order to boot from your newly attached Hard disk

- Now start your VM and enjoy your VM booting from your newly created Hard Disk.
You’ll get below error if the VirtualBox is not launched as Administrator
C:Program FilesOracleVirtualBox>VBoxManage internalcommands createrawvmdk -filename "C:tempMacOSX.vmdk" -rawdisk \.PhysicalDrive2
VBoxManage.exe: error: Failed to create the VirtualBox object!
VBoxManage.exe: error: Code CO_E_SERVER_EXEC_FAILURE (0x80080005) – Server execution failed (extended info not available)VBoxManage.exe: error: Most likely, the VirtualBox COM server is not running or failed to start.
C:Program FilesOracleVirtualBox>
Upon successful execution you’ll see output like below
C:Program FilesOracleVirtualBox>VBoxManage internalcommands createrawvmdk -filename "C:tempMacOSX.vmdk" -rawdisk \.PhysicalDrive1
RAW host disk access VMDK file C:tempMacOSX.vmdk created successfully.C:Program FilesOracleVirtualBox>
Verify the newly created vmdk file
C:Program FilesOracleVirtualBox>dir C:tempMacOSX.vmdk
Volume in drive C has no label.Volume Serial Number is cfdffg466734
Directory of C:temp
17-09-2013 03:45 PM 638 MacOSX.vmdk
C:Program FilesOracleVirtualBox>