VMWare Hypervisor Host and Network setup:
Install a VMware ESXi host, with one NIC card and have it configured to a IP address from your existing valid domain IP-addresses (prefer to be a static) (172.21.1.125).
Install vSphere server appliance and have it running either on the same host or on a different device that’s running in the same network (172.21.1.3)
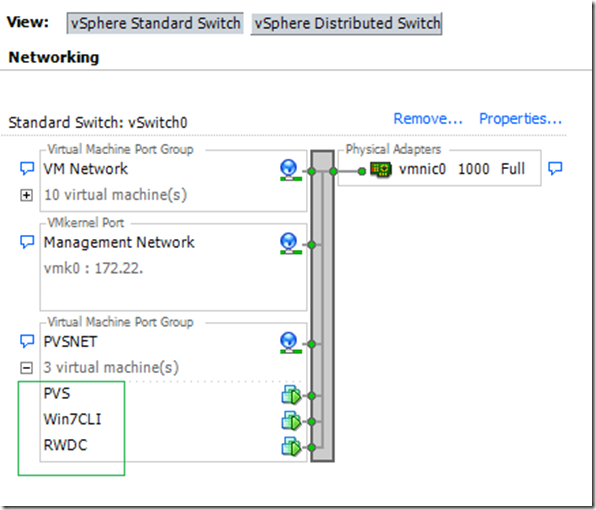
Create a separate VM Ports group to classify your Test VMs that going to use their own network setup but all of its traffic will travel with outside world via the same physical NIC adapter as shown below
Windows Systems setup:
Install two Windows 2008 R2 server, one for domain controller (TestDC) and other for member server (PVS).
Plan a name for your Windows Domain, I picked RWDC.lan in this example.
Install at least one client system say Windows 7 (Win7Cli)
Plan a private network class for your test domain and its systems networking.
The private address space specified in RFC 1918 is defined by the following three address blocks:
-
10.0.0.0/8
The 10.0.0.0/8 private network is a class A network ID that allows the following range of valid IP addresses: 10.0.0.1 to 10.255.255.254. The 10.0.0.0/8 private network has 24 host bits that can be used for any subnetting scheme within the private organization. -
172.16.0.0/12
The 172.16.0.0/12 private network can be interpreted either as a block of 16 class B network IDs or as a 20-bit assignable address space (20 host bits) that can be used for any subnetting scheme within the private organization. The 172.16.0.0/12 private network allows the following range of valid IP addresses: 172.16.0.1 to 172.31.255.254. -
192.168.0.0/16
The 192.168.0.0/16 private network can be interpreted either as a block of 256 class C network IDs or as a 16-bit assignable address space (16 host bits) that can be used for any subnetting scheme within the private organization. The 192.168.0.0/16 private network allows the following range of valid IP addresses: 192.168.0.1 to 192.168.255.254.
- In my case, I wanted to use 192.168.2.0 to 192.168.2.256 as my network range
Networking Windows Servers:
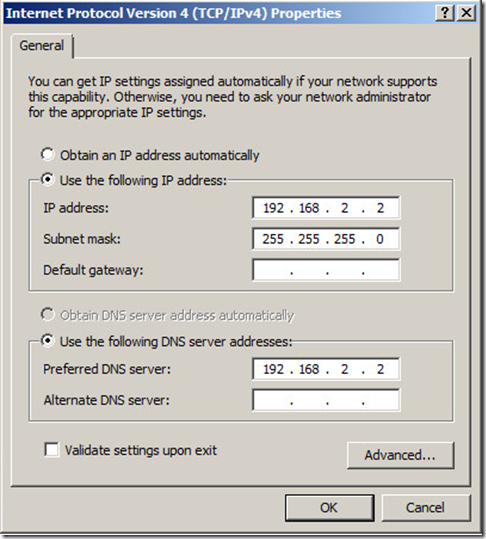
Chose one the Windows server (that is going to be your first Domain Controller where you’ll host your Windows AD DS), change the IP address to below values:
IP Address: 192.168.2.2
Subnet Mask: 255.255.255.0 (Will be auto populated)
Default Gateway: (can be left blank)
in Preferred DNS: 192.168.2.2 (Here you are pointing this server to itself for finding the DNS requests)
Then install the Active Directory Domain Services (AD DS) role on the server
Chose to install DNS server role on this first AD server, let the Wizard to use the default available network card with IP address 192.168.2.2 as its DNS serving interface.
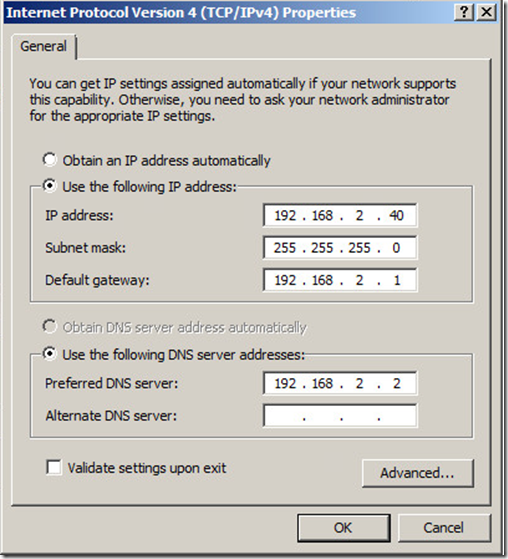
Login to your other server, set it’s IP-address to next available free address as below:
IP-address: 192.168.2.40 (I randomly picked 40 for my server, you may choose 3 or 4 in your case)
Subnet Mask: 255.255.255.0
Default Gateway: 192.168.2.1 (can be left blank, if not sure)
in Preferred DNS: 192.168.2.2 (here you pointing your member server to the DNS server)
Now join your member server PVS to your RWDC.lan domain


